 wire
wireGetting started
This guide installs Wire Lang, walks through your first
.wire file, and renders it to an SVG diagram — first from
the command line, then from JavaScript or TypeScript. It takes about
five minutes and needs Node.js 20 or newer.
1. Install
For the CLI and convenience library API, install
wire-lang. It
contains the library API and the wire command-line
binary. Install it into a project:
npm install wire-lang
You can also run the CLI without installing it permanently using
npx, shown below. Wire Lang is ESM-only and requires
Node.js 20+.
2. Write a .wire file
Create a file named led.wire. Every Wire Lang document
begins with the schematic keyword, then declares
components and the nets that connect their terminals. The example
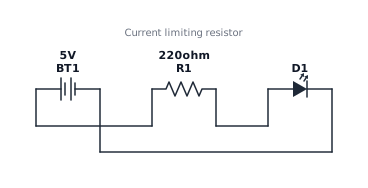
below describes a 5 V battery driving a red LED through a
current-limiting resistor:
schematic
  title "LED current limiting circuit"
  description "A 5V battery drives a red LED through a 220 ohm resistor."

  component BT1 Battery voltage=5V
  component R1 Resistor value=220ohm
  component D1 LED color=red

  net VCC: BT1.+, R1.1
  connect R1.2, D1.A
  net GND: D1.C, BT1.-

  annotation "Current limiting resistor" near R1
  render direction=left-to-right
A few things to notice. BT1, R1, and
D1 are component instances with unique
IDs. Battery, Resistor, and
LED are component types from the
standard library. VCC and GND are
named nets that join terminals such as
BT1.+ (the battery's positive terminal) and
R1.1 (resistor pin 1). The connect statement
creates an anonymous net between two terminals. See the
syntax reference for every statement.
3. Render it from the CLI
Use wire render to turn the source into a standalone SVG
file:
npx wire render led.wire --out led.svg
There is no preview server — open the generated
led.svg directly in a browser or image viewer. To
validate a file without producing output, use wire check;
to re-render automatically while you edit, use
wire watch. The
CLI usage guide covers all three commands.
4. Render it from JavaScript or TypeScript
The same pipeline is available programmatically. The happy-path API is
renderSvg, which takes source and returns an SVG string:
import { renderSvg } from "wire-lang";

const source = `schematic
  component R1 Resistor value=220ohm
  component D1 LED color=red
  net VCC: R1.1
  connect R1.2, D1.A
  net GND: D1.C`;

const svg = renderSvg(source); // SVG string, or throws WireLangError
For tooling and AI authoring you can also call parse and
compile directly to get the AST, the normalized schematic
model, and structured diagnostics:
import { compile, parse, renderSvg } from "wire-lang";

const parsed = parse(source);  // public AST, or partial AST + diagnostics
const result = compile(source); // { ok, model, diagnostics }
const svg = renderSvg(source); // SVG string, or throws WireLangError
5. Generate Wire Lang with AI
Wire Lang is built for AI-assisted authoring. Diagnostics carry source
locations and suggested fixes so an agent can self-correct, and the
CLI speaks JSON (wire check led.wire --json). A bundled
Agent Skill teaches assistants the syntax and component library:
npx skills add eduardozf/wire-lang --skill wire-langBrowser and Markdown
For plain HTML, use @wire-lang/browser@0.4.0 through npm or a CDN. For Markdown and MDX, use browser discovery or @wire-lang/markdown@0.4.0 with static rendering. See the integration guide for complete examples.
Next steps
- Syntax reference — every statement and the full standard component library.
- Examples — complete circuits you can copy and render.
- CLI usage —
check,render,watch, JSON output, and exit codes.